
TPE overmolding
Now is the time to start overmolding thermoplastic elastomers (TPEs). TPEs have traditionally been used to replace rubber, but new consumer market trends have made the overmolding idea a fact in the business world. Demand and trends in the consumer market are growing for better ergonomic feel and touch, grippability, looks, impact protection, vibration separation, and insulation. Consumer product designers are setting the standard for material makers to meet by coming up with solutions that look and feel good and work well in demanding end-use applications.
This essay talks about TPE overmolding technology in general terms and its as a group of materials that can be used to make designed solutions for this evergreen trend. In terms of rigid substrates, polypropylene (PP), polyethylene (PE), polystyrene (PS), high impact polystyrene (HIPS), polyphenylene oxide (PPO), glycol modified polyethylene terephthalate (PETG), Acrylonitrile Butadiene Styrene (ABS), and semicrystalline polar plastics like polyester (PET, PBT) and polyamide (Nylon 6, Nylon 66) are some examples. New technologies for mixing and compatilizing materials have made it possible to make goods that can be overmolded onto these different substrates.
For TPE overmolded onto rigid surfaces, a lot of things are very important. The first and most important thing is to choose the type of TPE that will work with the rigid base. Also important are the overmolding process (such as insert or 2K Moulding), the type of machine, the process conditions, how the material is prepared, the design of the part and the design of the mould. Unique material technologies, new part and tool designs, and improvements in overmolding technologies will keep designers’ minds active so they can meet the constantly growing needs of consumers for comfort, good looks, and added value.
TPE Overmolding Technology
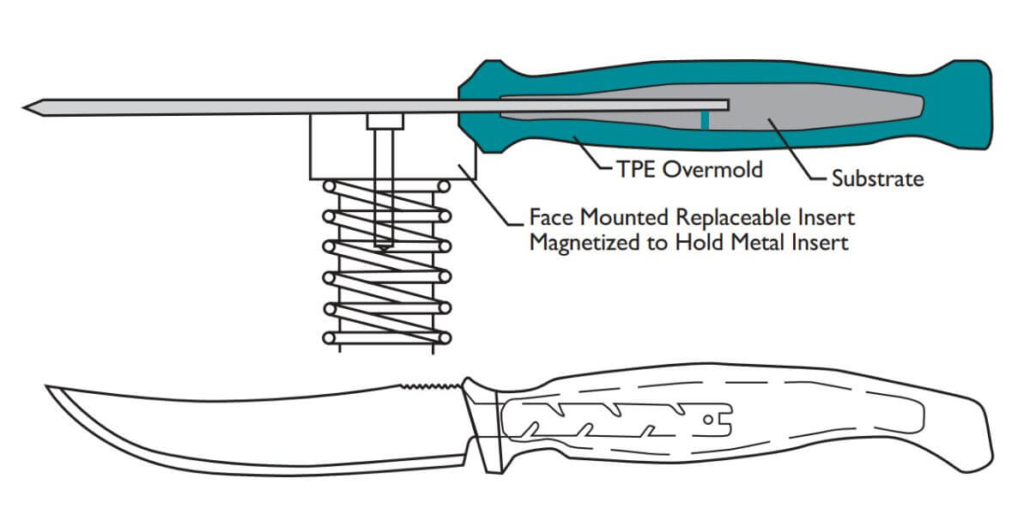
TPE Overmolding uses injection moulding to put one material (Over-Mold) on top of another material (Substrate). The over-molded material should stick to the substrate in a way that lasts in the end-use setting and works well. Over-molding gets rid of the need for glues and primers to attach TPEs to hard materials. Overmolding technology gives designers more freedom, lowers the cost of production, and makes it easier to make things. Multiple Material Moulding and Insert Moulding are the two main ways to do over-molding.
Injection moulding with more than one material is also known as multicolour or two-shot injection moulding. Figure 1 shows the kind of tools that are used. They have two or more injection units. The injection machine arms can be set up so that they are parallel to each other or at right angles to each other. There are two sets of holes in the mould. One set moulds the base material, and the other set moulds the covering material.
There are two steps to the two-shot moulding process. The first step is for the first barrel to fill the substrate’s set of holes. Once the substrate is cool, the mould opens and the side that can be moved turns 180° without the substrate coming out of the mould. Next, the mould is closed, and the over-mold material is injected into the second barrel. The second half of the mould is filled in on the side that stays still. If the over-mold material needs to be shaped on both sides of the part, the mould might move the parts between two sets of holes instead of turning.
Rotary Platen Machines vs. Rotary Die Machines: A rotary platen on the second part of the press is sometimes built into the machine to make it turn. When a rotary platen is used four times separately, mould halves that are mounted on it are typically used. There are times when the rotation is built into the tool itself, and there are only two mould halves but four sets of mould holes.
Moving: The tool in the Core process has a moving part that is powered by hydraulics or air. Once the first substrate has been injected and given time to cool, a mould section pulls back, making a space for the TPE over-mold material. The TPE is then introduced, most of the time from the side of the hole that is visible when the insert is pulled back. This method has faster cycle times, more cavitation, and better machine performance. The only problem is that only a constant thickness of TPE can be used.

Insert Molding-insert overmolding
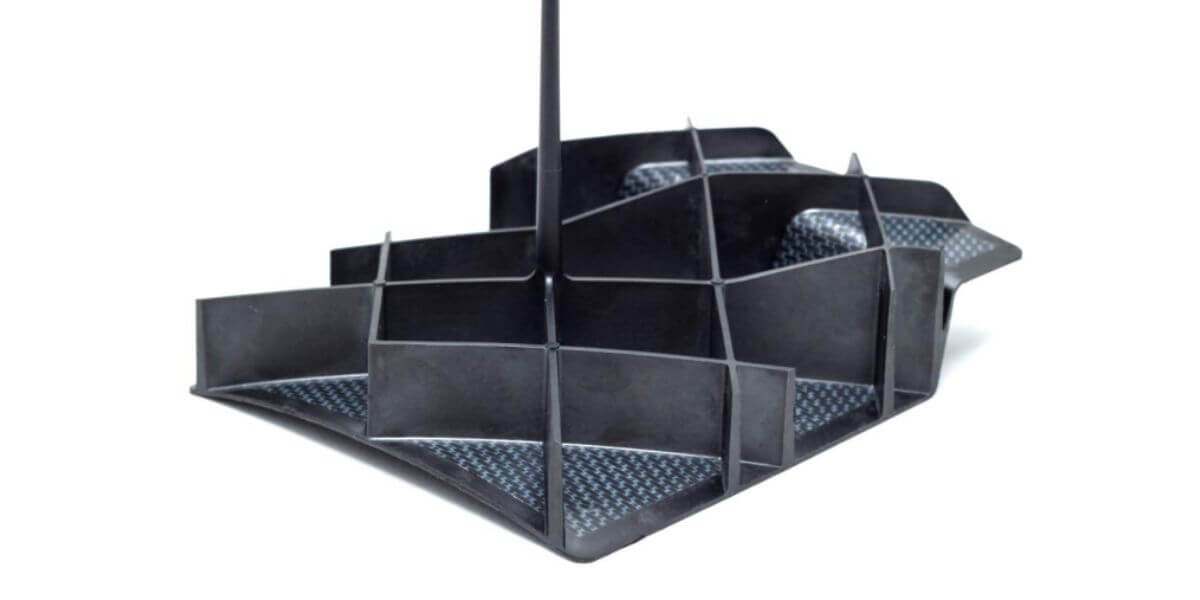
Insert molding is one of types of overmoldings, during insert moulding, a hard plastic substrate or metal part that has already been moulded is put into the hole by a robot or a person (Figure 2). The second material, called “over-mold,” is put on one side of the insert or around the whole thing other times. For insert moulding, standard injection moulding tools are used.
Rotate or move around? Table Moulding: A horizontal injection unit or a robot is used to shape a substrate or put an insert in the second cavity in the first position. The table moves or turns to the next station, where another horizontal or vertical injection unit is used to put the TPE in. You can use a hot sprue or put the runner at the splitting line. A third turn of the rotary unit’s table sends it to a “off-load” station, where the finished two-part part is ejected.
TPE Overmolding Process
Which of the possible processes and mould designs to use relies on the material chosen, the cost of labour, the tools and machines that are available, and the economics of making a lot of them. If the insert is not a thermoplastic, insert moulding has to be used. If you only need a small amount of the plastic or metal substrate, the cost of local labour is low, and you need to keep the cost of the tools low, you should place them by hand. For larger amounts of work, shuttle tools can be used. Robotically placed inserts and rotary table tools can be used when the amount of work needs to be done justifies the cost. If you need to make a lot of parts or the cost of labour is high where you live, two material moulding machines are best for plastic substrates. For the highest production numbers and the nicest-looking parts, hot runner systems with valve gates are best.
Overmolding Part Design Considerations
There are a lot of different parts to designing overmoldings, and this paper talks about some general things to keep in mind.
When it comes to materials, bondable TPEs have stricter rules than regular TPEs. The same is true for making parts. When designing two-part parts, you have to think about how the two different flexible materials will shrink, which is different from designing one-part parts. Both have their own gate and runner systems that need to be customised based on the features of the material being used.
To get the best cycle time, the thin walls of the base and over-mold should be as even as possible. In most over-molding situations, walls that are between 1 mm and 3 mm thick will join well. If the part needs thick areas, they should be cored out to keep the part from shrinking too much and to cut down on cycle time and weight. To avoid flow issues like back fills and gas traps, changes in wall thickness should be made slowly. Adding circles (at least 0.5 mm) to sharp corners can help lower stress in that area. Deep dark pockets or ribs that can’t be opened should be avoided. Long draws should have a draft of 3 to 5 degrees to help the ball get out. Deep undercuts can be made with over-mold compounds, but only if an advance core is used when the mould opens, the part doesn’t have any sharp edges, and the elastomer is allowed to bend as it comes out of the mould.
When moulded, most TPE compounds shrink a fair amount in the direction of flow but not much when moulded in the cross-flow direction. This could cause the over-molding material to shrink more than the substrate once the part is taken out of the tool. This can then cause the substrate part to warp or cup, generally in the direction of the flow of the overmolding material. In parts where the substrate is thinner than the over-mold or where a low stiffness substrate material is used, this is especially true. the parts should be long and thin. This can be partially fixed by using base materials with a higher modulus and adding stiffening ribs to the substrate. It will also help to use thinner coats and an over-mold grade with less hardness. Moving the gate to change the flow pattern of the TPE might also help.
Shore hardness, which is a material’s resistance to being dented on a 6.3 mm minimum thickness moulded plate (ASTM D2240), is used to measure TPE materials. An item with a lower hardness feels softer on the outside, even if it is the same thickness. But because overmolding is usually only done on the thin skin of TPE, the hard base below affects how soft it feels. If this is put through a hardness test, a smaller indenture will show that the rock is harder, even if the skin is soft. If the rubber over-mold is to be on both sides of the parts (A and B), two material moulds must be used that can move between mould sections.To make a smooth layer on a part or the whole side of a simple part, you should use two material moulds with moving cores. The output rate can be very high, depending on how thick the walls of the elastomer and the substrate are.
How TPE Sticks to Engineering Thermoplastic
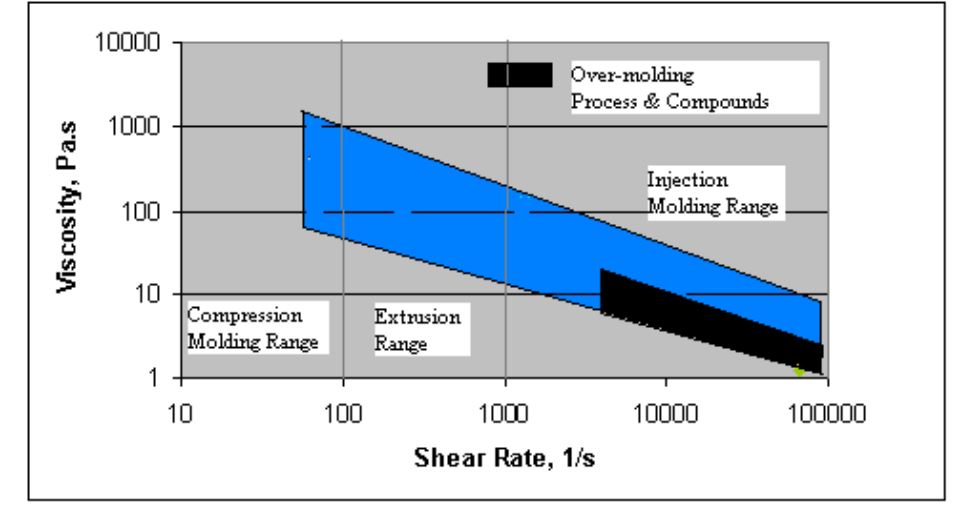
There are many things that can change how well hard engineering plastic and soft rubber stick together. To build specific relationships between materials, it’s important that the surface energies of both of them are the same. The power of TPE to stick to a surface is another important factor. For certain reactions to happen between the TPE and the substrate, they need to be very close to each other and the surface needs to be wet. The way the TPEs theologize, as shown in Figure 3, determines how they wet out. Over-molding materials don’t have a very high viscosity. They are also sensitive to shear and show shear thinning behavior.
Below picture shows that the viscosity is near the lower end of the range when the flow rate is high. This helps the TPE run into and fill thin-walled areas that are common in over-molding.
The chemistry of the TPE and the type of industrial plastic have a big effect on how well it wets. As well as the adhesion qualities, the elastomer’s diffusion and viscoelastic properties also play a role. The point where the TPE and stiff substrate meet is very important for both the bond strength and the type of failure, which can be either cohesive (C) or adhesive (A). When looking for signs of a strong bond, the cohesive system is usually thought to be the best way to tell. But a weak TPE with only moderate bond strength can make it look like the linking is strong. There are times when good bonding exists even when the glue fails. There are three types of processes at the contact that can help the rigid substrate and the soft thermoplastic elastomer stick together. These can be seen in below picture.
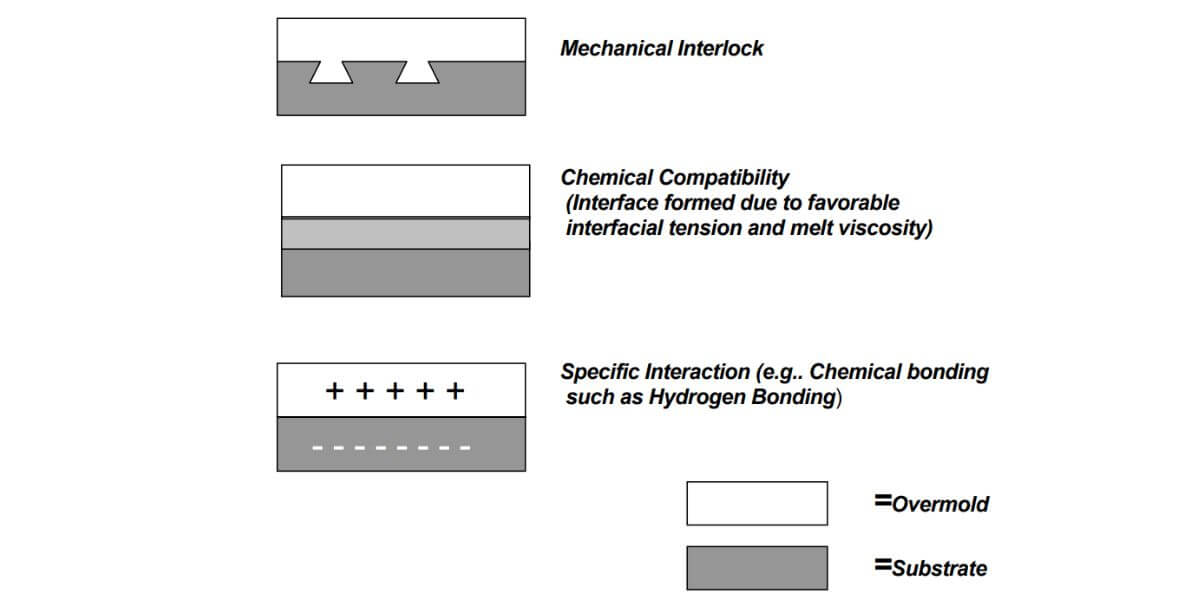
Design is what makes mechanical connection possible. Not a real link is made between the two surfaces, but any TPE will work in this case. The second way works because the substrate and the overmolding TPE material are chemically compatible. Chemical compatibility is based on the surface energies, which are connected to how well the substrate and TPE stick together. When the moulding method and temperature are right, an interface can form where the molecules of the base and the overmold mix. You can make an interface with a styrenic TPE or an olefinic TPE that has been moulded onto polyethylene as the base. The third way can be built into the TPE. The bonding process is made up of specific polar interactions or chemical reactions between the groups of the TPE and the rigid substrate.
A “90-degree Peel Test” can be used to find out how strong the bond is between the TPE and the industrial plastic. We changed the ASTM D903 method for plastics to test how well soft TPE sticks to hard thermoplastic. A moulded base with a TPE skin insert moulded on top of it is used for the tests. An Instron tension tester is used to cut and pull a strip of TPE that is an inch wide at a right angle to the base. It is locked in place on the wheel so that the 90-degree angle stays the same while the rubber is being pulled. The adhesion strength is found by how hard it is to pull the elastomer away from the base. This force is usually over 2 inches. It is put into two groups based on whether it fails because of adhesive failure (A) or cohesive failure (C). Adhesive failure means that there is no TPE residue left on the material. The numbers given are the average of three different studies of adhesion. Because the customer wants a certain level of adhesion, we’ve decided that an adhesion number higher than 12 pli is good enough.
Today, there is a huge interest in overmolding TPEs onto rigid substrates, especially for market goods that need to have a soft touch. New TPEs are being overmolded onto a growing number of substrates. This gives designers more design freedom and the chance to make their goods stand out in a market full of “me-too” copies.
TPEs are very famous because they help with sales at the point of sale. People today have a huge selection of goods to choose from in stores, and companies that make goods want to make theirs stand out. There are many good reasons to pick a product with an TPE overmolding surface, such as new colours, textures, patterns, and comfort. For many people, a “warm” soft touch feels better than a hard plastic feel. And things that look and feel like rubber are often thought to be more valuable. People are smarter about finding goods that fit their bodies better and reduce vibrations now that they know more about ergonomics and the rise in joint overuse injuries. Overmolded TPEs can also be useful for things other than feel and usability. Some examples are providing a safe, strong grip in wet areas, waterproofing gaskets and seals, molded-in “bumpers” to protect against impact and prevent early breaking, and reducing vibration.


Leave a Reply
Want to join the discussion?Feel free to contribute!